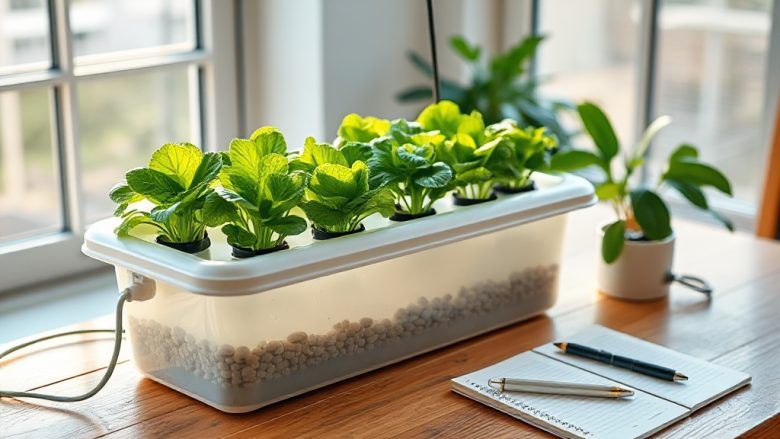
Most people assume hydroponics means pumps, timers, chemistry sets and a garage full of humming equipment. It doesn’t. My first working system was a plastic storage tub, a cheap air pump, a net pot and a lettuce seedling. Total cost was about the price of two takeaway meals, and it produced leaves for six weeks.
When you learn how to get started with hydroponics, you really only make three decisions: what you want to grow, which system suits that plant, and where the water and light will come from. Get those right and you can have roots in nutrient solution this weekend. Get them wrong and you’ll spend money replacing dead seedlings, which is exactly what happened to me twice before I figured out the pattern.
What Hydroponics Really Is (and What It Isn’t)
Hydroponics is growing plants with their roots in water that carries dissolved nutrients, rather than in soil. That’s the whole idea. The roots still need oxygen, the leaves still need light, and the plant still needs the same minerals it would pull from ground. You’re just delivering those things directly instead of letting soil act as the middleman.
What it isn’t: a magic method that ignores plant biology. A common beginner mistake is treating nutrient solution as fuel. More isn’t better. Too strong a mix burns root tips and locks out calcium and magnesium, and the plant stalls while looking strangely healthy from above. I learned this the hard way with a batch of basil that went limp overnight after I doubled the dose “to help it along.”
Soil-free growing also changes your daily routine. There’s no guessing whether the top inch of compost is dry. You measure. You check pH, you check the strength of the solution, you top up what the plant drank. It sounds fussy, but it takes about four minutes a day once you know your system, and you’ll spot problems far earlier than you would in a pot of soil.
One more thing worth saying plainly: hydroponics suits leafy greens, herbs, chillies, tomatoes and strawberries beautifully. It suits carrots, potatoes and anything you grow for a big storage root far less well. Choose crops that match the method rather than fighting the method to grow what you fancy.
Pick Your First System Without Overthinking It
There are dozens of named systems, but for a first setup only three matter. Deep water culture floats a plant in a net pot above an aerated reservoir. The roots dangle into the solution and an air stone keeps it oxygenated. It’s the cheapest, the quietest and the most forgiving, and it’s what I’d recommend to anyone starting out. Lettuce, basil, mint and spinach thrive in it.
Drip systems pump nutrient solution onto a growing medium such as clay pebbles or coco coir, then let it drain back. They handle bigger plants like tomatoes and peppers, but they need a timer, more tubing and more attention to blockages. Nutrient film technique runs a shallow stream of solution past bare roots in a channel. It’s elegant and fast-growing, but a power cut of an hour can dry roots out completely. Save it for your second or third build.
Then there’s the question of how you’ll start plants. You can buy seedlings, root cuttings in a glass of water, or germinate seeds in rockwool cubes or small plugs. Seeds are cheapest and give you the widest choice, but they add two to three weeks before anything goes into the system. Buying a living lettuce from a shop and separating the root ball is a sneaky shortcut that works surprisingly well for a first attempt.
Match the system to the plant, not the other way round. A deep water culture tub with four lettuce plants will outperform an expensive drip rig stuffed with the wrong crop every single time.
Gather the Supplies You Actually Need
You need less than the internet suggests. For a deep water culture setup you’ll want an opaque container with a lid, net pots that sit in holes cut in that lid, a small air pump with tubing and an air stone, a growing medium such as clay pebbles or rockwool, a two-part or one-part nutrient blend designed for leafy greens, a pH test kit or pen, and a way to measure nutrient strength. A cheap electrical conductivity meter covers that last job.
The container matters more than people expect. Light hitting the water grows algae, and algae competes with your plants for nutrients while turning the reservoir into soup. Paint an old tub black, wrap it in tape, or buy an opaque one. I lost a whole cycle to a translucent box before I understood why the water kept turning green.
For light, a sunny south-facing windowsill can carry lettuce and herbs through spring and summer. If you’re growing indoors year-round or in a dim room, a basic LED grow light on a simple timer will do the job. You don’t need the most powerful fixture on the market. You need one that covers your plants evenly and doesn’t cook them.
Skip, for now, the pH-down and pH-up bottles, the beneficial bacteria, the root stimulants and the bloom boosters. Buy them later if a specific problem demands it. Beginners who start with a shelf of additives usually end up guessing which bottle caused the problem.
Step-by-Step: Setting Up Your First Hydroponic System
Start by choosing a spot. It needs steady light, a temperature that stays roughly between 18 and 24 degrees Celsius, and a power socket for the air pump. Kitchens and spare rooms work well. Cold garages and draughty sheds slow growth and invite root problems.
Mix your nutrient solution in a bucket according to the label, using the weakest dose listed, not the strongest. Fill the reservoir so the water sits just below the bottom of the net pot. The roots should reach down into the solution, but the pot itself shouldn’t be submerged, or the stem will rot.
Place your seedling or plug into the net pot and surround it with clay pebbles for support. Set the pot into the lid. Switch on the air pump and check that bubbles are moving through the whole reservoir, not just one corner. If your pump is too small for the volume of water, the roots at the far end will suffocate.
Now leave it alone for a day. Seriously. New growers fiddle constantly, topping up, adjusting, moving plants around. Give the system 24 hours to settle, then check pH. Leafy greens generally want something in the region of 5.5 to 6.5, and you’ll be adjusting gently rather than chasing a perfect number.
From there, the routine is simple. Top up the reservoir with plain water as the level drops, because plants drink more water than they take nutrients and the solution gets stronger over time. Change the whole reservoir every one to two weeks. Check pH every couple of days at first, then weekly once you know how your water behaves.
Troubleshooting the Problems Beginners Hit First
Yellowing lower leaves usually means the nutrient strength has drifted too high or the pH has moved out of range, blocking uptake. Dilute the reservoir with plain water, reset the pH and watch new growth rather than old leaves. If the yellowing spreads from the top down instead, suspect too much light or too much heat.
Slimy, brown, smelly roots are a sign of root rot, which almost always traces back to warm water and too little oxygen. Empty the reservoir, rinse the roots gently, clean the container and refill with cool, fresh solution. Add a second air stone if the reservoir is large.
Stretched, spindly seedlings that lean toward the window mean insufficient light. Move the system closer to the source or add a grow light, and keep the lamp at the height the instructions suggest rather than guessing.
Algae is the easiest problem to prevent and the most annoying to fix. If you can see green film on the container walls or the surface of the pebbles, light is getting in. Block it. Cover exposed medium with a layer of pebbles or foil, and make sure the lid fits snugly.
Finally, don’t panic about slow growth in the first week. Transplanted seedlings spend several days rebuilding roots before they push new leaves. If the roots look white and the leaves are upright, you’re on track. Give it time before you change anything.
Frequently Asked Questions About Starting Hydroponics
How much does a beginner hydroponic setup cost?
A simple deep water culture build with a tub, air pump, net pots, pebbles and nutrients typically costs less than a modest night out. You can reduce that further by reusing food-grade containers and starting plants from seed rather than buying seedlings.
Can I grow hydroponically without electricity?
Passive systems such as a wicking bed or a simple kratky-style container with a static water level can work for lettuce and herbs, since the roots take oxygen from an air gap as the water level drops. Growth is slower and you’ll need to manage the water level carefully, but it’s a genuine option for a windowsill.
How often do I need to change the nutrient solution?
Every one to two weeks for most leafy crops. Topping up with plain water between changes keeps the concentration stable. If the solution looks cloudy, smells odd or the plants stall, change it immediately rather than waiting for the calendar.
What are the easiest plants for a first attempt?
Loose-leaf lettuce, basil, mint, chives and rocket. They’re fast, compact, tolerant of small mistakes and happy in a deep water culture tub under modest light. Leave tomatoes, peppers and strawberries until you’ve completed one full cycle.
Do I need a grow light if I have a sunny window?
For herbs and lettuce in spring and summer, often not. In winter, or in a room that only gets a few hours of direct sun, a basic LED grow light makes a dramatic difference to how compact and healthy the plants grow.